Saturday, August 17, 2013

Mt. Langley via Old Army Pass - 8/5/13

**This trip report is for Mt. Langley via Old Army Pass, a route that I absolutely do not recommend trying unless you're 100% certain the trail is completely free of snow and ice. In the snow, the route can be deadly (and even without snow, it's pretty treacherous). If there's a chance there might still be any snow on the switchbacks leading up to Old Army Pass, you should take New Army Pass instead. In other words, please don't die.**

Two years ago, we decided that Mt. Langley should be our second 14er, and this summer, we finally got our chance to give it a go.

Mt. Langley and Cottonwood Lake #1

After getting rejected from the Mt. Whitney lottery, we planned our camping trip around hiking Mt. Langley instead. We couldn't get overnight permits for the Cottonwood Lakes trailcamp halfway up the Langley trail, but we were hoping to be able to get them at the Lone Pine visitor center the day before our hike.

We started our acclimation with two nights at the Onion Valley Campground, which is almost as nice as Whitney Portal. The trees give you lots of shade, and you get to fall asleep to the sound of the waterfall below the lakes on the Kearsarge Pass Trail. The campground is supposed to have an active bear population, but we never saw any. It does, however, have a pretty active human population.


Matlock Lake

Our first acclimation hike started at the Onion Valley Trailhead and followed the Kearsarge Pass Trail about 2.5 miles to Gilbert Lake, the first big lake right off the trail. The second day, we took the same trail, but continued past the lakes to Kearsarge Pass at 11,700'. We were thinking about continuing from there to scramble up to Mt. Gould, but we decided the view from the pass was awesome enough and we didn't want to wear ourselves out before attempting Langley. Make sure to take the 1/2 mile detour on the way back down after passing Flower Lake to get to Matlock Lake. It's definitely the nicest of the (easily accessible) lakes on the trail.


The view from Kearsarge Pass

There were no permits available at Cottonwood Lakes for the night we wanted to climb Langley, so we stayed our final night at the non-reservable Horseshoe Meadows Campground right by the Cottonwood Lakes Trailhead that takes you to the top of Mt. Langley. Several of the campsites come with hitching posts, in case you need to bring your horse with you.

Most people seem to agree that Langley is a slightly easier hike than Whitney, but we still made sure to prepare for the hike to take over 12 hours, and got our start at 3:00am. Unlike Whitney Portal, no one else at the campground was waking up when we got up, and we didn't see anyone on the trail at all for the first several miles.

The first few miles of the trail are mostly flat until about 4 miles in when you start gaining the 1000' to the Cottonwood Lakes, but even that is spread out over about 2 miles. There aren't too many activities that are more peaceful than hiking in the dark, and after trying it out several times, you realize that there's not really anything to be afraid of.


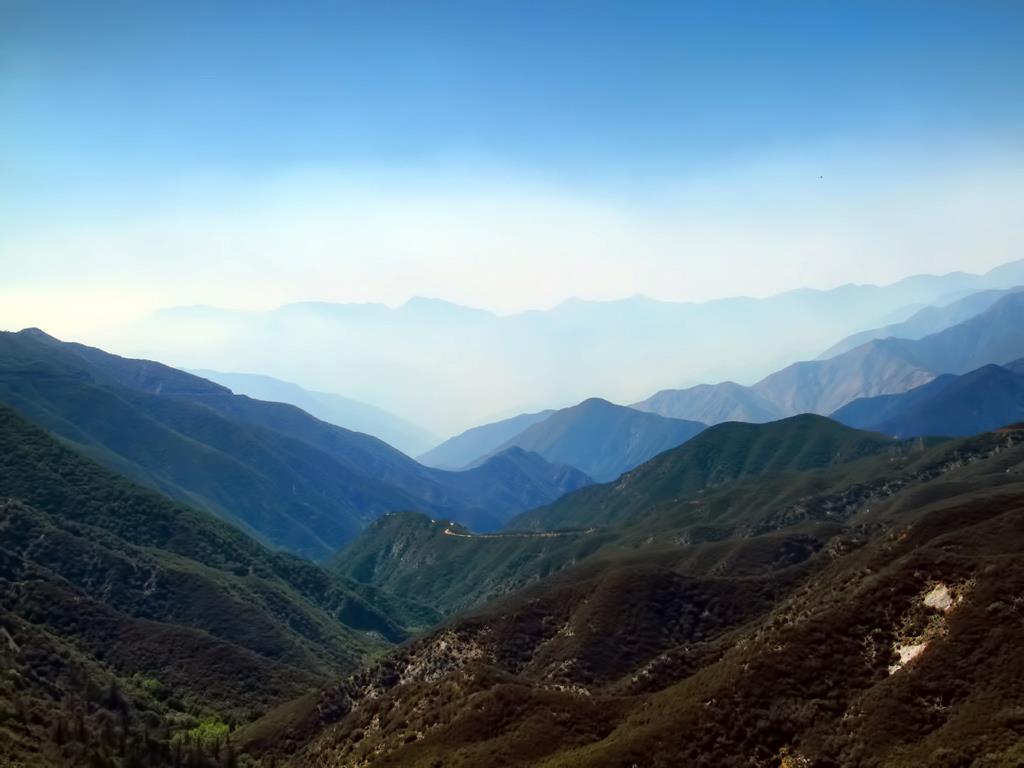
The sky started to glow right before we reached the first of the five Cottonwood Lakes. Even though it's not completely necessary to start your hike before dawn, watching the reflections of the sunrise in the lakes is probably one of the most beautiful things you'll ever see.


Sunrise over Cottonwood Lake #1

We got to the area between lakes 4 and 5 just in time to climb up to a spot where we could watch the sky change color behind us as the sun continued to rise, and look above the lakes where the tips of the peaks were glowing orange.


This spot is about 6 miles into the hike, but the final 5 miles of the hike are much harder than the first half. This is also the last spot to filter water, so make sure to fill up enough for the next 10 miles. If you look up to the west of lake 4, you'll see where the switchbacks take you over Old Army Pass. You probably won't be able to see the trail at all from the lake, but there is a use trail that you can follow all the way to the top (there was one when we were there, anyway).


There's a trail there somewhere

Follow the path around the lake and eventually it'll start taking you up the switchbacks where you need to go. Ascending, there arent too many opportunities to slip, but it's still scary knowing that slipping could be disastrous. It's steep enough that you'll have to take it pretty slow, even if you're not completely terrified of heights.


The switchbacks above lake #4

When you reach the pass, the Great Western Divide and Sequoia peaks come into view. This area is a popular hangout spot for marmots (and their token bunny friend). The next 3 miles are mostly pretty gentle, but I definitely wouldn't call them easy since you're above 12,000' by this point. The incredible view stays in sight to your left the entire way, as an added bonus.

Sequoia and the Great Western Divide


The final mile is where the class 2+ scrambling comes in. We were told to stay toward the west to avoid the hardest climbing, but even the route we ended up taking required some arm strength. I had to take my time here to find the route that freaked me out the least. The scrambling section is really pretty short (the one we took was, at least), but the final summit push after that is a really tiring switchbacking scree slope. If you took a route all the way to the west like we did, once you get to the summit, there's still about a 1/2 mile to go before getting to the actual high point.

It's not that hard to find the high point--just keep moving east, following the cairns until you see the summit register. The summit rock isn't that big, and on the north side, there's a ridiculous sudden drop about 10,000 feet down. The view from up there might actually be better than the view from Mt. Whitney. You can see Mt. Whitney and all his buddies, and if it's clear enough, you can just make out the San Gabriels in the opposite direction.


Mt. Whitney
Tiny San Gabriels
On the way back down, the only really tough sections are the class 2+ scrambling section, and the switchbacks after Old Army Pass that take you back down to the lakes. Take your time on the hard parts; you really don't want to slip.

If you started your hike in the dark, you might not have gotten a chance to appreciate lake #3. This was the first shade we found on our descent, and it's a good spot for a break if you can trust yourself not to fall asleep.

Cottonwood Lake #3

Wednesday, July 24, 2013

Lookout Mountain from Baldy Village - 4/21/13

We're rapidly running out of peaks to bag in the San Gabriels, and even though most of them are worth climbing more than once, it's time to start exploring some of the less popular trails. One of our most recent route finding adventures was on Lookout Mountain.

There are a few different starting points for this hike, but we chose to start from Baldy Village and follow the beginning of the Bear Canyon Trail. We had an idea of when to leave the main trail, but we were planning to rely on our maps to find our way. Luckily, we ran into an off-trail hiking expert who gave us some tips on how to stick to the least overgrown trail.

At Bear Flat, you leave the trail and start walking on a use trail full of whitethorn and manzanita bushes that isn't very pleasant if you're wearing shorts and prefer your leg skin to remain intact.

Ow.

The trail is mostly hot and exposed but after a while, you end up in the canyon among some big ass trees next to a stream in bear-friendly territory. At some point, you have to leave the "trail" and head straight up to get out of the canyon. (Sorry, that's about as detailed as I can get. Bring a map.)

Enjoy the shade.

When it starts to look like this again, you're almost there.

No more shade.

The peak doesn't have the greatest views, but it does have some impressive history. A couple of dudes went up there in the 20s and measured the speed of light.

Science.

If you're one of those creepers who crushes on Mt. Baldy, Lookout Mountain is a good place to sit and stare.

*drool*

Instead of heading back the way we came, we tried to find a route toward Cow Canyon Saddle, but never found it and ended up sand surfing our way down the mountain. Eventually, you'll find a sort of maintained-ish trail that takes you to the saddle. Parts of this trail are just completely gone and aren't particularly safe, but if you survive you'll end up at Cow Canyon Saddle staring at a bunch of oddly placed tractor tires.

Weirdness courtesy of the Monrovia fire
From there, we just walked down Glendora Ridge Road back to Baldy Village.

Monday, July 22, 2013

Sugarloaf and Ontario Peaks via Falling Rock Canyon - 7/20/13

We've been wanting to try Sugarloaf for a long time, but for some reason we thought it was enough of a rock fall hazard that we'd need helmets. We looked through some trip reports the day before our hike and realized that the helmets were only necessary for winter climbing. This report is for a summer hike. If you're planning to try this in the winter, go read someone else's report first.

As usual, this hike comes with warnings. It's called Falling Rock Canyon for a reason, so don't follow too close behind the person in front of you. And whatever you do, DON'T TOUCH THE STINGING NETTLES.

This is a stinging nettle. You'll thank me later.
The trail starts out at Icehouse Canyon and follows the main trail for about 1/4 mile. At that point, you should cross over to the other side of the creek. You'll find Falling Rock Canyon behind the ruins about 1/2 a mile past the Icehouse trailhead; it's the first canyon on the south side of the creek. Look for the cairns.


I was under the impression that the entire climb would be class 3, but there are really just a few short class 3 sections. Go slowly, hold on tight, don't look down. I don't think a fall would be deadly, but you'd be in pretty bad shape.


If you find yourself at a point where you can safely turn around, look behind you and enjoy an unusual view of Mt. Baldy.


About a mile into the canyon, you'll turn right and head straight up a rocky scree slope. This part is steep and annoying, but it's only about 1/4 of a mile. Once you get to the saddle between Sugarloaf and Ontario, there isn't much more climbing left to do.


Scree Slope

From the saddle, head north about 1/2 a mile and you'll find yourself on top of Sugarloaf Peak. Just over 2 miles and about 2000' of gain up to this point. The view of Baldy from the 6,924' summit is a nice one as usual, but Telegraph steals the show. Stats aside, Telegraph appears more prominent than any other peak around.

Telegraph showing off

Once you get back to the saddle, you have the option to scree surf your way back down the canyon, or you can keep going toward Ontario Peak.

A use trail appears for stretches as you climb your way up the ridge to Ontario, and someone went wild with the cairns on this route, so there's not much routefinding to do.

There's a lot of this

When you get to the trail-less section full of manzanitas, whitethorn, and dead trees, you're almost there. You'll meet up with the Ontario trail and then there's less than 1/4 mile to go before you reach the summit. The whole climb is just 4.5 miles and about 4200' of gain.

Manzanitas, whitethorn, and dead trees

You could go back the way you came if you really want to avoid Icehouse Highway, but the 6 miles back down the main trail is probably more pleasant, especially if you get treated to a nice summer drizzle like we did.

Sunday, March 17, 2013

Snow Hike Fails - Ontario (12/21/12), Ontario/Cucamonga (3/2/13)

Snow hiking can be pretty awesome. You get to use all the fancy gear that you keep hidden away for most of the year, it feels like you're walking around on some other planet (like New York or Minnesota), and you get to glissade your way down the mountain. 

The downside is that it's unpredictable and dangerous, and sometimes you have no choice but to turn back.

Baldy Bowl from the Ontario Trail - December 2012

We attempted Ontario Peak last December, forgetting that the amount of snow we can see from the city doesn't reflect the amount of snow that's actually on the mountains. We got about a mile past Kelly Camp (just under a mile from the summit) when the soft snow suddenly* turned into ice and there was no way to safely continue (not without an ice axe, anyway).

Ontario Trail

Snowy ass Kelly Camp

On our most recent trip, we'd planned to hike at least Etiwanda and Cucamonga, and hoped to have enough energy to get to Bighorn and Ontario too. It hadn't snowed in a week and it looked like there was barely any snow left. Once again, we were so wrong.

There is much less snow now than there was in December, but the recent high temperatures have turned the snow into a slippery death trap. 

Naked Baldy Bowl - March 2013

Between the five hikers in our group, we had three pairs of snowshoes, three pairs of microspikes, two pairs of crampons, and two ice axes, but we still only made it about half a mile past Icehouse Saddle on the Cucamonga trail before we decided it was too dangerous to continue. Then we gave the snow one last chance and hiked about a quarter of a mile on the Ontario trail before we gave up and just climbed Timber Mountain instead.

Ontario from Timber

We took Chapman Trail back down the mountain to try to ditch the crowds, but there were a few big patches of snow on some of the narrow parts of the trail that were pretty scary. It's a long way down. I'd stay away from Chapman for a while.

*When I say suddenly, I mean Matt thought he was stepping on snow but slipped about 10 feet and had to self-arrest.

Sunday, January 20, 2013

Mt. Baden-Powell Snow Hike from Vincent Gap - 1/19/13

There's always that moment at the beginning of a snow hike when you're like "if I put on my spikes now, I might ruin them walking over rocks, but if I don't put them on, I might slip on some ice." This hike did not have that moment. The trailhead is only around 6600' but it's on the dark side of the mountains where the snow sticks around for longer, so there was no question about whether or not we'd need our spikes right from the beginning.

Baden-Powell trailhead at Vincent Gap

If you've ever done this hike in normal conditions, you'll know it's one of the easier of the major peaks in the San Gabriels, only gaining 2800' in the short 4 mile ascent. Fortunately for us, the conditions are far from normal right now.


The snow wasn't too deep for the first mile or so, but there were some slippery spots and steep slopes that put the spikes to good use. After about a mile and a half, we left the main trail and started following some boot tracks going straight up the mountain, and that's where the postholing party began. If you're one of those super-prepared snow hikers who doesn't mind carrying some extra gear, the middle section of the hike seemed pretty perfect for snowshoes.


This wasn't one of those friendly snowy trails where you posthole to your knees every once in a while and by the end of the hike it's still sort of funny; we were postholing to our waists with every damn step and probably moving somewhere around half a mile per hour for a good chunk of the hike.

Pine, Dawson, and Baldy

It took us almost 4 hours to reach the ridge and finally see that classic panoramic view of Baldy and the surrounding peaks. Less than half a mile to go. As you walk across the Baden-Powell backbone toward the summit, stay as far away from the left side as possible--it's hard to tell where the trail stops and the cornice starts.There was absolutely no wind that day, so this section wasn't nearly as scary as it could have been.


We were completely alone on the extremely comfortable sunny summit. I guess everyone was climbing the Ski Hut Trail to Baldy, which, compared to Baden-Powell is actually a fairly easy snow hike.

The best part of a snow hike is the descent, when you get to say "suck it" to all those annoying switchbacks, and glissade your way down the mountain. We were lucky enough to have some butt tracks to follow to keep our glissading experience relatively safe, and you definitely need to be carrying a pole or an ice axe to self-arrest when the glissading gets out of hand.

It's only January and we've already done more snow hiking than we did all of last winter. Let's hope the snow lasts a few more months.

Baldy and buddies from Baden-Powell

Sunday, September 16, 2012

Buckhorn Peak (Mt. Akawie), Mt. Williamson, Pallett Mountain - 8/26 and 8/27

In case you don't live in Southern California or you've just been locked inside your air conditioned home for the last few weeks, we've been experiencing a pretty relentless heat wave and hiking is pretty much out the question. This particular weekend was relatively mild and we figured it wouldn't be too bad above 8000', so we made our third (and most successful!) attempt at camping in the San Gabriels to bag some of our few remaining local peaks. 

Buckhorn Peak isn't much of a hike but it's a good warm up for Williamson and Pallett (and Will Thrall and Pleasant View Ridge) if you're out of shape thanks to the never ending Summer. I hear there might be a trail that takes you at least part of the way up the mountain, but we just walked behind our Buckhorn campsite (#8) and scrambled our way up.


This way to Buckhorn

After about a mile of steep and slippery scrambling, we found a flat area that looked a lot like Mt. Waterman. We looked around and didn't see anything else that could have been Buckhorn Peak, so we decided we'd made it and sat down to enjoy the view. Plenty of nice flat shady spots for a picnic or a tent and a perfect view of the peaks along Pleasant View Ridge.


Pleasant View Ridge

After a relaxing night at the surprisingly quiet and empty campground, we headed to the Islip Saddle trailhead to go for the four peaks we thought we could do in one day. We didn't start early but we should have; this isn't an easy hike and it was way too hot that day for a ridge climb.

If I'd done better research, I might have known ahead of time that this is some Three T's/North Backbone/Iron Mountain roller coaster shit and you do not want to take it lightly. You have to remember that every time you descend from a peak down to a saddle, you'll have to climb all the way back up to get back to your starting point.

Steep Ridge to Williamson (from Pallett)

Once you leave the PCT and start the ridge hike, the views open up on either side of you: Bear Canyon and the rest of the San Gabriels to the south and the Mojave to the north. The scenery almost makes it worth enduring the Summer heat.

Bear Canyon

Mojave

You'll reach Williamson about 2.5 miles and 1500' into the hike. After Williamson, the next peak you climb up to isn't a peak at all, but a pain-in-the-ass bump on Williamson (but you can call it Little Willie).

Next you'll drop down about 800' just to climb right back up about 600' more to get to Pallett. Ah, finally! Now for the descent. NOPE. You still have 4 more miles to go and about 1200' more to gain on your way back to Islip Saddle. Good luck with that. Eventually we'll take another Angeles Crest Highway trip to climb Will Thrall and Pleasant View Ridge (the peak, not to be confused with Pleasant View Ridge the ridge), but not until the temperatures drop at least 20 degrees.

Holcomb Canyon

Saturday, August 25, 2012

Mt. Whitney - 7/24/12

After several months of intense training, we've completed our second dayhike of Mt. Whitney. Our five training hikes were specifically designed to prepare us for the altitude, length, and elevation gain of Mt. Whitney, but really, every hike is preparation for Whitney. There's something unique and exciting about each trail I've been on, but my biggest motivation for hiking regularly is to keep myself in good enough shape to climb my favorite mountain.
 
These were the training hikes:

1. Jones Peak, Hastings Peak, Mt. Wilson via Bastard Ridge
2. Timber Mountain and Telegraph Peak
3. Mt. Baldy, Mt. Harwood, and West Baldy via Register Ridge
4. Mt. Islip, Mt. Hawkins, Throop Peak, and Mt. Baden-Powell
5. San Gorgonio Mountain

Although this year's Mt. Whitney hike had some incredibly special moments, it wasn't really different enough from last year's climb to warrant another trip report, so instead I'll give you my best of and least-good lists.

The Best of Mt. Whitney Climb #2:

5. Remembering last year's hike


Not really a moment, but several moments, mostly on the ascent when I said "Oh yeah, I remember this part of the trail!" And a few times when I remembered which section of the trail came next, bringing back the same feelings of nervousness and excitement from the original climb.

4. The windows


As much as these freak me out and I'd almost rather wait until I get home and just look at the pictures, they're like the mountain's final encouraging push to help us get through the last section after all those exhausting hours of climbing. 

3. The view from trail crest


You've finally huffed and puffed your way up 97 switchbacks and you're considering the possibility of calling it a hike and turning back, when you look to the west and say "Holy shit, where the hell did all those mountains come from?"

2. Alpenglow 


In our case, alpenglow came a few minutes after we reached trail camp and turned the Sierra Crest into a fiery wall of granite. Don't look away; it only lasts a few minutes.

1. Sunrise over Lone Pine 


Last summer I saw the most amazing sight I'd ever seen and I spent a year waiting to see that sunrise again, partly worrying that my memory was an exaggeration and that it wouldn't look quite so incredible the second time around. But it managed to be even more spectacular this year.

The Least Good:

5. The Windows 

Yes, they're on both lists. They didn't scare me this time as much as they did last year, but it's still a 3000' drop on either side of a narrow walkway. There are actually parts of the trail between trail crest and the summit that are narrower than the windows, but the drop is only on one side of you and they're not convenient landmarks like the windows.


Don't fall

4. Nowhere to pee

The mountain hasn't suddenly sprouted trees out of the rocks at 13,000'. If you want some privacy, you're out of luck for the majority of the hike.

Good luck

3. Being afraid to sit down for fear of falling asleep

Some people hike Mt. Whitney in 3 days, others do it all in 8 hours, but at some point everyone has to take a break. If you're like us and hiking on 3 or 4 hours of sleep, you'll have to be careful not to let your snack breaks turn into nap breaks.


Perfect nap spot

2. The Pain 

My shoes don't fit quite right and my pants scrape the flesh off my sides, but even if you have all the best quality and most comfortable gear, you'll inevitably end up with sore muscles and probably a few blisters. Hopefully you make it through most of the hike without constant cringing, but mile 22 is unlikely to end up being the most pleasant experience of your life.

"Wimps"

1. The Weather

Some people are unfortunate enough to be greeted by thunder clouds on their way up the mountain and they're forced to turn back prematurely, but just like last year, we ended up with perfect weather: no thunderclouds, no rain, clear skies. There was absolutely no chance we'd have to turn back for weather-related reasons, but that doesn't mean the weather wasn't a total pain in our already-sore butts. The sun is bright, the wind is crazy strong, and the summit was about 20 degrees when we were there, but it's a pretty good sign when the biggest complaint I have after 22 miles and 6000' of gain is that the weather was annoying.


Now enjoy a Mt. Whitney picspam.